How to create Create AlertDialog With Custom Layout Programmatically (Java)?
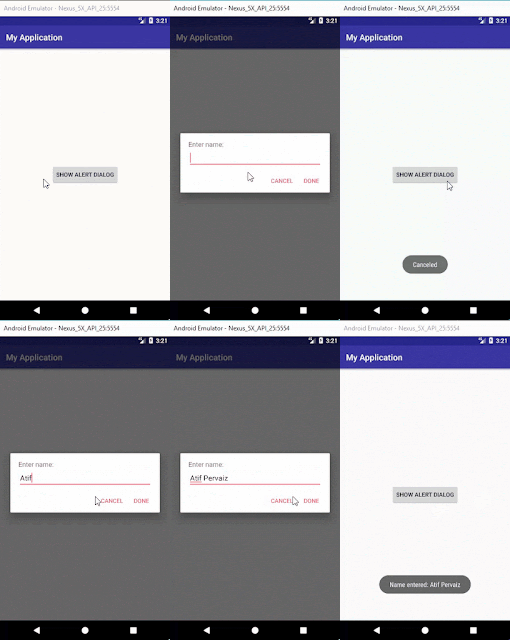
In this tutorial we will create AlertDialog with custom layout programmatically in Java using Android Studio IDE. We will create a button to show that AlertDialog and show output in Toast. You can also display this information anywhere such as TextView etc or save at some place.
Step 1: Create a new project OR Open your project
Step 2: Code
activity_main.xml
<?xml version="1.0" encoding="utf-8"?>
<android.support.constraint.ConstraintLayout xmlns:android="http://schemas.android.com/apk/res/android"
    xmlns:app="http://schemas.android.com/apk/res-auto"
    xmlns:tools="http://schemas.android.com/tools"
    android:layout_width="match_parent"
    android:layout_height="match_parent"
    tools:context=".MainActivity">

    <Button
        android:id="@+id/showAlertDialogBtn"
        android:layout_width="wrap_content"
        android:layout_height="wrap_content"
        android:text="Show Alert Dialog"
        app:layout_constraintBottom_toBottomOf="parent"
        app:layout_constraintLeft_toLeftOf="parent"
        app:layout_constraintRight_toRightOf="parent"
        app:layout_constraintTop_toTopOf="parent" />

</android.support.constraint.ConstraintLayout>
MainActivity.java
package com.jigopost.myapplication;

import android.content.DialogInterface;
import android.support.v7.app.AlertDialog;
import android.support.v7.app.AppCompatActivity;
import android.os.Bundle;
import android.util.TypedValue;
import android.view.View;
import android.widget.Button;
import android.widget.EditText;
import android.widget.LinearLayout;
import android.widget.TextView;
import android.widget.Toast;

public class MainActivity extends AppCompatActivity {

    @Override
    protected void onCreate(Bundle savedInstanceState) {
        super.onCreate(savedInstanceState);
        setContentView(R.layout.activity_main);

        Button mShowAlertDialogBtn = findViewById(R.id.showAlertDialogBtn);
        mShowAlertDialogBtn.setOnClickListener(new View.OnClickListener() {
            @Override
            public void onClick(View view) {
                showAlertDialog();
            }
        });
    }

    private void showAlertDialog() {
        AlertDialog.Builder mBuilder = new AlertDialog.Builder(this);
        LinearLayout mLayout         = new LinearLayout(this);
        TextView mTvMessage          = new TextView(this);
        final EditText mEtInput      = new EditText(this);

        mTvMessage.setText("Enter name:");
        mTvMessage.setTextSize(TypedValue.COMPLEX_UNIT_SP, 16f);
        mEtInput.setSingleLine();
        mLayout.setOrientation(LinearLayout.VERTICAL);
        mLayout.addView(mTvMessage);
        mLayout.addView(mEtInput);
        mLayout.setPadding(50, 40, 50, 10);

        mBuilder.setView(mLayout);

        mBuilder.setNegativeButton("Cancel", new DialogInterface.OnClickListener() {
            @Override
            public void onClick(DialogInterface dialogInterface, int i) {
                Toast.makeText(MainActivity.this, "Canceled", Toast.LENGTH_SHORT).show();
            }
        });
        mBuilder.setPositiveButton("Done", new DialogInterface.OnClickListener() {
            @Override
            public void onClick(DialogInterface dialogInterface, int i) {
                String name = mEtInput.getText().toString();
                Toast.makeText(MainActivity.this, "Name entered: " + name, Toast.LENGTH_SHORT).show();
            }
        });

        mBuilder.create().show();
    }

}
Step 3: Run Project
Output

